UK
UK FR
FR


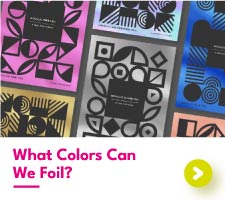


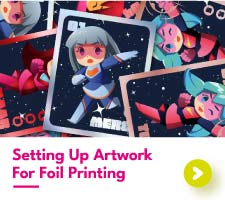


Setting Up Artwork For Foil Printing With Examples
Setting Up Artwork For Foil Printing With Examples
Thinking about creating your own shimmering foil masterpieces? Whether you want to add a golden glow to your business cards, a rainbow holographic to your playing cards, or a beautiful black chrome to your invitations, you’re going to need to know how to set up your artwork for foil printing.
The process of foil printing requires your artwork to be supplied differently from standard printing. But don’t let this discourage you from foil! We’re going to guide you through the complete process of setting up your foil artwork from start to finish, including some examples to help you get the best printed results.
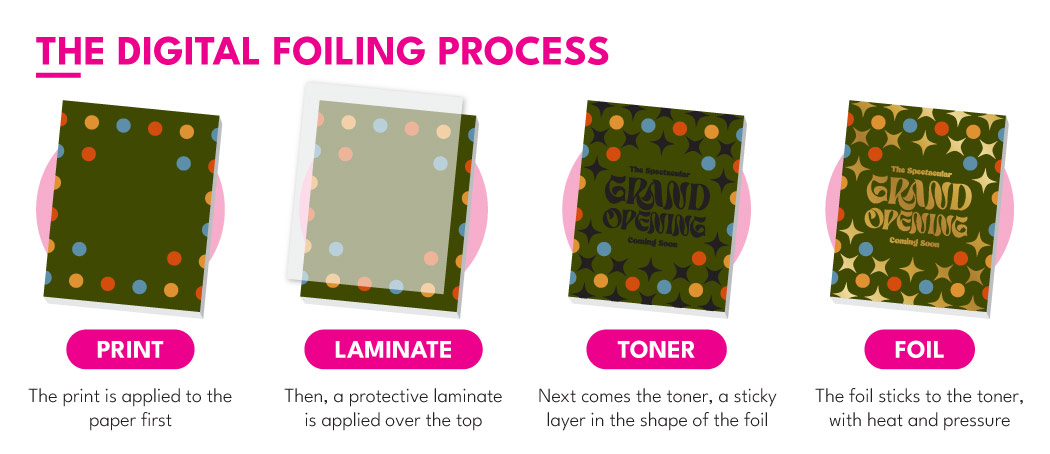
A Brief Run Down Of Digital Foiling
To help you gain a better understanding of foil artwork, let’s briefly cover the digital foil printing process.
The digital foil printing process is made up of four steps – print, laminate, overprint, and foil.
First, your printed design is applied to the paper of your choice. Then, the paper is laminated with our in-house favorite soft touch laminate. This lamination is a crucial step to foiling as it helps to protect the print area underneath during the rest of the process.
After lamination, your designs are then overprinted with a sticky black toner in the shape of your foil design. Once run through the foil machine, the foil sticks to the black toner, leaving the rest of the print untouched.
The most important thing to take from all of this is that the print is applied before the foil, not the other way around.
Foil Print Artwork Requirements
Now that we understand a little more about the foil process for holographic printing and more, it’s time to get to work creating your artwork. As the foil part of your designs is applied much later on than the print, it doesn’t make sense for the print and foil to be sent over together. Instead, we require your design files to be set up as follows:
· Front Foil: All foil in 100% pure black on a white background. Any print must be removed.
· Front Print: No foil areas should be visible. The print should continue smoothly underneath the foil.
· Back Foil: All foil in 100% pure black on a white background. Any print must be removed.
· Back Print: No foil areas should be visible. The print should smoothly continue underneath the foil.
Make sure to supply each of the above either in separate files or on different pages. We don't recommend supplying files on individual layers, as at first glance, it may appear that your artwork has not been split apart.
Another super helpful file to send to our team is a composite file. A composite file shows how the end result should look, with the print and the foil together. Our team will use this file as a reference to be sure the files provided will give you the results you want.
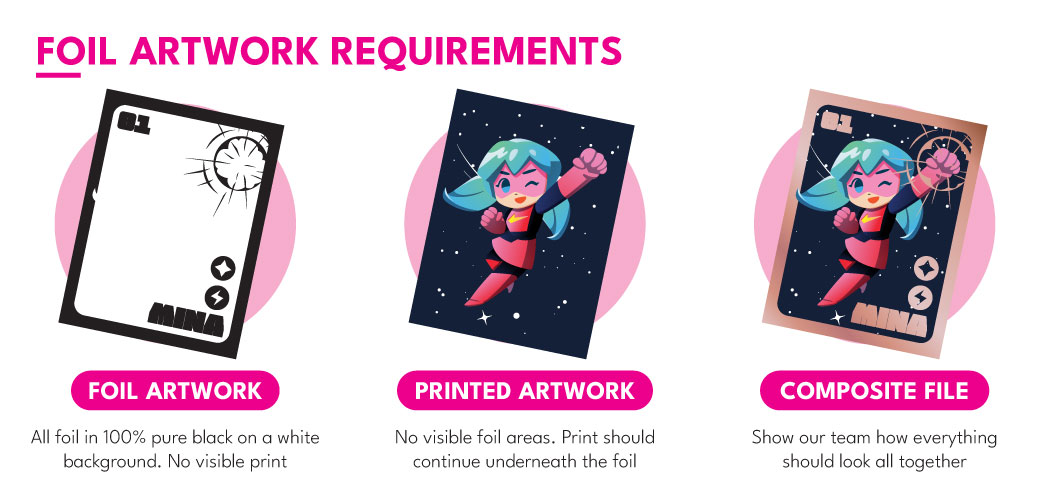
Remember to label your files, it really helps our design team out!
How To Set Up Artwork For Foil Printing With Examples
Now, we know that everyone's foil artwork is different. Sometimes, following the above steps is simple. Other times it can involve a little more tweaking to get your artwork just right. Of course, we cannot cover every single possible combination of print and foil. But we can take a look over the most popular design styles and how each needs to be set up for foil printing.
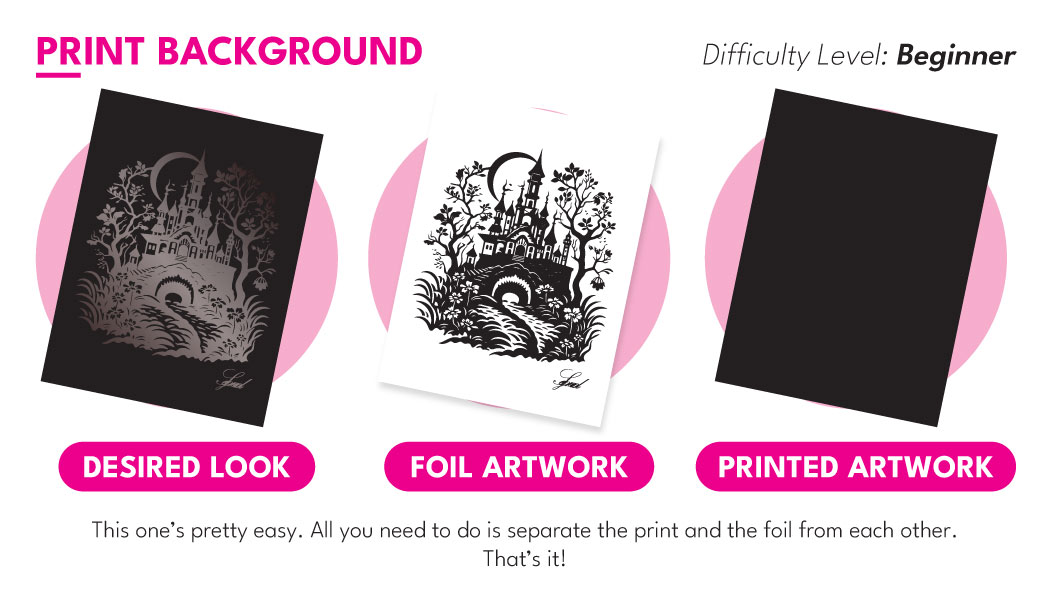
This type of design is straightforward to split apart for foiling. The print file contains the solid background and the foil file contains the design to be applied over the top. As neither the print or the foil directly interacts with the other, neither needs to be adjusted in this case. Just make sure to label which file is which, especially if you choose to print anything black.

Interweaving print and foil is incredibly popular for wedding invitations and other, more technically challenging designs. This type of foil file can sometimes be a little tricky, but with some patience, you'll be able to get the right result.
First, line your print and foil up together to see where the print should be showing over the foil. Then, cut out the areas of your foil file in white where the print is intended to show. This prevents the foil from covering the print and makes the print look like it's above the foil.
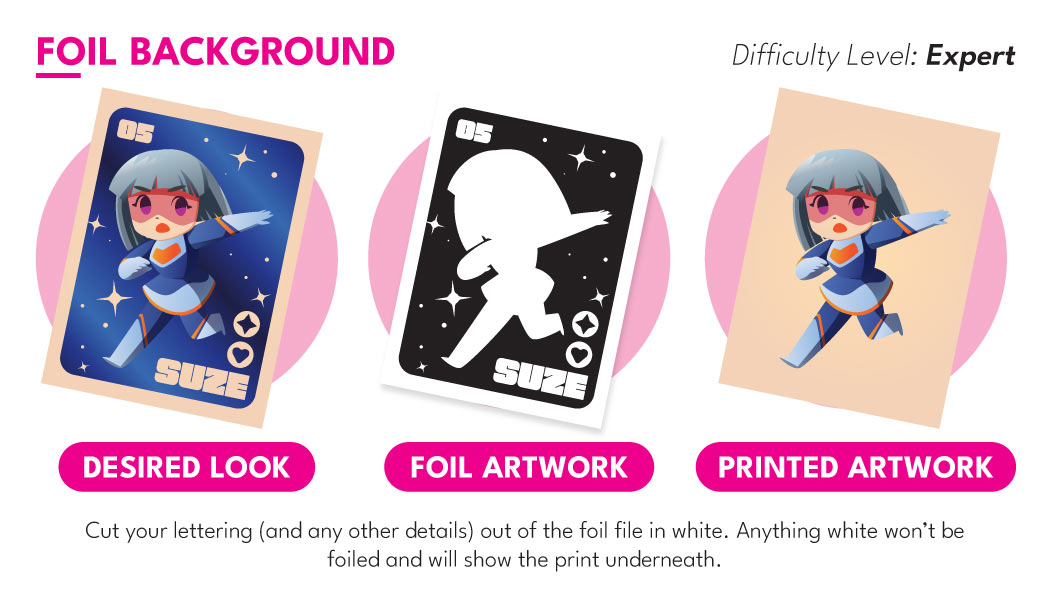
A common misconception in foil printing is that the print is applied over the top of the foil. So, when most people want to print a foil background, they will supply their foil file as a solid black page. But this will just cover the print completely.
Instead, what you need to do is cut your print design out of the foil file. Anything white on your foil file won't actually be foiled. So, pop all your print onto that file, change it to white, and there you have it, a completely foiled background that won't hide your precious print.
Limitations Of Foil Printing
We'd love to sit here and tell you that digital foiling is flawless every single time. That foiling can be done to any design that you can think of with ease. But this wouldn't be true.
Foil printing does have its limitations. It's important for you to know the restrictions imposed by foil before deciding to go ahead. After all, we wouldn't want you to end up with prints you're not happy with.
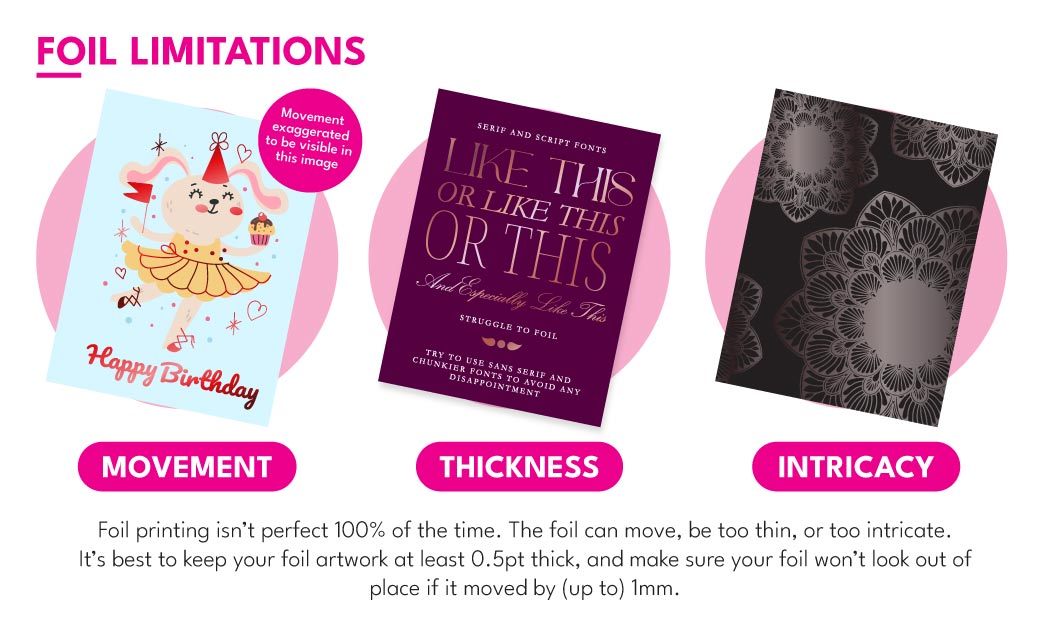
Foil Movement Tolerance
Like all aspects of print, foil has its own movement tolerance. What this means is that the foil will not always land in the exact same place every single time. It may be a little more to the left, the right, up or down. This movement, unfortunately, cannot be prevented.
At Aura Print, our foil movement tolerance is 1mm or less from its original position. Most of the time, the foil won't move the full 1mm, sometimes it may only move 0.5mm or less. We pride ourselves on having one of the lowest movement tolerances out there for digital foiling but even we cannot stop any movement from happening at all.
Foil Thickness And Intricacy
Thin foil designs struggle to produce a complete foil. The reason behind this is that the fine elements cannot attach to the toner underprint. This will leave small black gaps on the final artwork where the toner has not stuck to the foil sheet. To prevent this from happening, we recommend that all foil elements be at least 0.5pt thick.
The same can be said for the foil intricacy. When detailed areas of foiling fall very close together, instead of producing distinct shapes, the foil will fill in the gaps. As well as ensuring all the foil (black areas) are 0.5pt, we also recommend that any white (non foiled areas) also be 0.5pt thick.
Printing With Foil At Aura Print
If you've read through this post and still need some help getting your head around foil printing then don't worry! We know that printing with foil is a new (and potentially scary) experience for many of our customers. Our dedicated designers are here in-house and can check over your foil artwork before you've even placed an order. Simply get in touch today to get started with your foil printing project.